
we will explore the Inpaint Anything / Segment Anything extension and examine the simplicity of the inpainting process through this method. By utilizing the Inpaint Anything extension, stable diffusion inpainting can be performed directly on a browser user interface, employing masks selected from the output generated by Segment Anything.
Segment Anything empowers users to effortlessly designate masks by merely pointing to the desired regions, eliminating the need for manual filling. This approach enhances the efficiency and precision of mask creation, potentially yielding superior inpainting outcomes while minimizing the investment of time and effort.
Contents
Inpaint Anything for Stable Diffusion Web UI
Inpaint Anything extension performs stable diffusion inpainting on a browser UI using any mask selected from the output of Segment Anything.
Using Segment Anything enables users to specify masks by simply pointing to the desired areas, instead of manually filling them in. This can increase the efficiency and accuracy of the mask creation process, leading to potentially higher-quality inpainting results while saving time and effort.
Installation
To install the software, please follow these steps:
- Open the
Extensionstab on the AUTOMATIC1111's Stable Diffusion Web UI. - Select the
Install from URLoption. - Enter
https://github.com/Uminosachi/sd-webui-inpaint-anything.gitin theURL for extension's git repositoryfield. - Click on the
Installbutton. - Once installation is complete, restart the Web UI.
- Note: This extension supports v1.3.0 or higher of AUTOMATIC1111's Stable Diffusion Web UI.
Running the application
- If you intend to use the memory-efficient xformers, please append the
--xformersargument to your startup command. For example, run./webui.sh --xformersorwebui.bat --xformers - Note: If you have a privacy protection extension enabled in your web browser, such as DuckDuckGo, you may not be able to retrieve the mask from your sketch.
- Note: In Gradio version 3.23.0 or older, the segmentation image may appear small on the Web UI.
Downloading the Model
- Navigate to the
Inpaint Anythingtab in the Web UI. - Click on the
Download modelbutton, located next to the Segment Anything Model ID. This includes the Segment Anything in High Quality Model ID, Fast Segment Anything, and Faster Segment Anything (MobileSAM).- Please note that the SAM is available in three sizes: Base, Large, and Huge. Remember, larger sizes consume more VRAM.
- Wait for the download to complete.
- The downloaded model file will be stored in the
modelsdirectory of this application's repository.
Usage
- Drag and drop your image onto the input image area.
- Outpainting can be achieved by the
Padding options, configuring the scale and balance, and then clicking on theRun Paddingbutton. - The
Anime Stylecheckbox enhances segmentation mask detection, particularly in anime style images, at the expense of a slight reduction in mask quality.
- Outpainting can be achieved by the
- Click on the
Run Segment Anythingbutton. - Use sketching to point the area you want to inpaint. You can undo and adjust the pen size.
- Hover over either the SAM image or the mask image and press the
Skey for Fullscreen mode, or theRkey to Reset zoom.
- Hover over either the SAM image or the mask image and press the
- Click on the
Create maskbutton. The mask will appear in the selected mask image area.
Mask Adjustment
Expand mask regionbutton: Use this to slightly expand the area of the mask for broader coverage.Trim mask by sketchbutton: Clicking this will exclude the sketched area from the mask.Add mask by sketchbutton: Clicking this will add the sketched area to the mask.
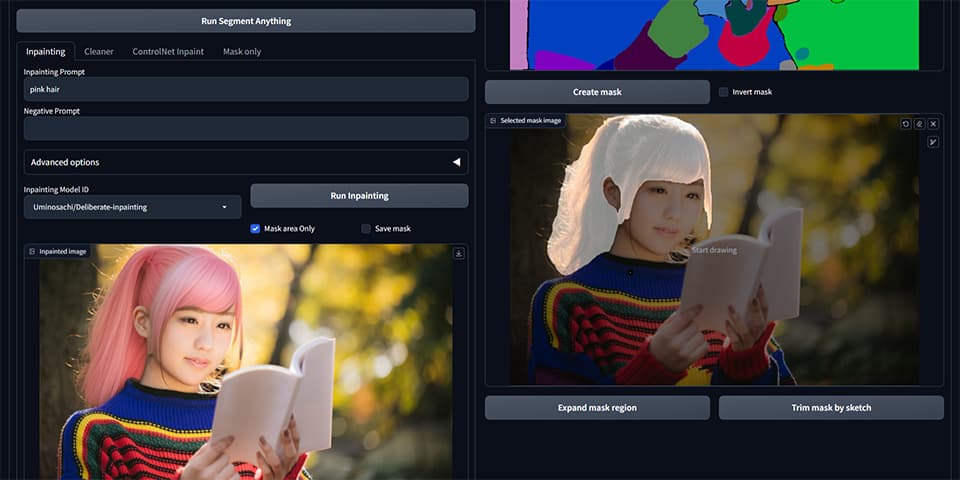
Inpainting Tab
- Enter your desired Prompt and Negative Prompt, then choose the Inpainting Model ID.
- Click on the
Run Inpaintingbutton (Please note that it may take some time to download the model for the first time).- In the Advanced options, you can adjust the Sampler, Sampling Steps, Guidance Scale, and Seed.
- If you enable the
Mask area Onlyoption, modifications will be confined to the designated mask area only.
- Adjust the iteration slider to perform inpainting multiple times with different seeds.
- The inpainting process is powered by diffusers.
Tips
- You can directly drag and drop the inpainted image into the input image field on the Web UI. (useful with Chrome and Edge browsers)
- To load prompts saved in a PNG file, follow these steps:
- Drag and drop the image into the 'PNG Info' tab on the Web UI, then click
Send to txt2img (or img2img). - Navigate to the 'Inpainting' section within the 'Inpaint Anything' tab and click the
Get prompt from: txt2img (or img2img)button.
- Drag and drop the image into the 'PNG Info' tab on the Web UI, then click
Model Cache
- The inpainting model, which is saved in HuggingFace's cache and includes
inpaint(case-insensitive) in its repo_id, will also be added to the Inpainting Model ID dropdown list.- If there's a specific model you'd like to use, you can cache it in advance using the following Python commands (venv/bin/python for Linux and MacOS):
venv\Scripts\python.exefrom diffusers import StableDiffusionInpaintPipeline
pipe = StableDiffusionInpaintPipeline.from_pretrained("Uminosachi/dreamshaper_5-inpainting")
exit()- The model diffusers downloaded is typically stored in your home directory. You can find it at
/home/username/.cache/huggingface/hubfor Linux and MacOS users, or atC:\Users\username\.cache\huggingface\hubfor Windows users.
Cleaner Tab
- Choose the Cleaner Model ID.
- Click on the
Run Cleanerbutton (Please note that it may take some time to download the model for the first time). - Cleaner process is performed using Lama Cleaner.
Inpainting webui Tab
- This tab becomes accessible when you have an inpainting model.
- The required model should include
inpaint(case-insensitive) in its filename and must be located in thestable-diffusion-webui/modelsdirectory. - Once the model is recognized, it becomes selectable from the Inpainting Model ID dropdown list.
- The process can be executed swiftly, without requiring model loading, when the Stable Diffusion checkpoint (located in the upper left corner of the Web UI) matches the selected Inpainting Model ID.
ControlNet Inpaint Tab
- To execute inpainting, use the Stable Diffusion checkpoint located in the upper left of the Web UI, and pair it with the ControlNet inpaint model.
- Enter your desired Prompt and Negative Prompt.
- Click on the
Run ControlNet Inpaintbutton to start the process.- In the Advanced options, you can adjust the Sampler, Sampling Steps, Guidance Scale, Denoising Strength, and Seed.
- The Control Weight and Control Mode can be modified in the ControlNet options.
- The Reference-Only Control can be utilized if the Multi ControlNet setting is configured to 2 or higher.
- The IP-Adapter can be utilized if the IP-Adapter model is present in the
extensions/sd-webui-controlnet/modelsdirectory, and the ControlNet version is updated.
- Make sure to install the ControlNet extension that supports the
inpaint_onlypreprocessor and the ControlNet inpaint model. - Requires: The sd-webui-controlnet extension and the ControlNet-v1-1 inpaint model in the
extensions/sd-webui-controlnet/modelsdirectory.
Mask only Tab
- Gives ability to just save mask without any other processing, so it's then possible to use the mask in img2img's
Inpaint uploadwith any model/extensions/tools you already have in your AUTOMATIC1111. Get mask as alpha of imagebutton: Save the mask as RGBA image, with the mask put into the alpha channel of the input image.Get maskbutton: Save the mask as RGB image.- After the
Get maskbutton press you can useSend to img2img inpaintbutton under the mask image to send both input image and mask to the img2img tab.
Auto-saving images
- The inpainted image will be automatically saved in the folder that matches the current date within the
outputs/inpaint-anythingdirectory. - You can switch to the
outputs/img2img-imagesdirectory via theInpaint Anythingsection found in theSettingstab on the Web UI.
Development
With the Inpaint Anything library, you can perform segmentation and create masks using sketches from other extensions.
License
The source code is licensed under the Apache 2.0 license.
References
- Kirillov, A., Mintun, E., Ravi, N., Mao, H., Rolland, C., Gustafson, L., Xiao, T., Whitehead, S., Berg, A. C., Lo, W-Y., Dollár, P., & Girshick, R. (2023). Segment Anything. arXiv:2304.02643.
- Ke, L., Ye, M., Danelljan, M., Liu, Y., Tai, Y-W., Tang, C-K., & Yu, F. (2023). Segment Anything in High Quality. arXiv:2306.01567.
- Zhao, X., Ding, W., An, Y., Du, Y., Yu, T., Li, M., Tang, M., & Wang, J. (2023). Fast Segment Anything. arXiv:2306.12156 [cs.CV].
- Zhang, C., Han, D., Qiao, Y., Kim, J. U., Bae, S-H., Lee, S., & Hong, C. S. (2023). Faster Segment Anything: Towards Lightweight SAM for Mobile Applications. arXiv:2306.14289.